This article explains how special effects were created in the Unity sample project Happy Harvest, with the VFX Graph and Shader Graph (Unity 2022 LTS).
You can download and install Happy Harvest from the Unity Asset Store.
This page covers some of the techniques and tool sets that are explained in depth in two advanced e-books available for free:
- 2D art, animation, and lighting in Unity
- The definitive guide to creating advanced visual effects in Unity
Please see the other articles in this series to learn how to replicate the effects and visuals in Happy Harvest:
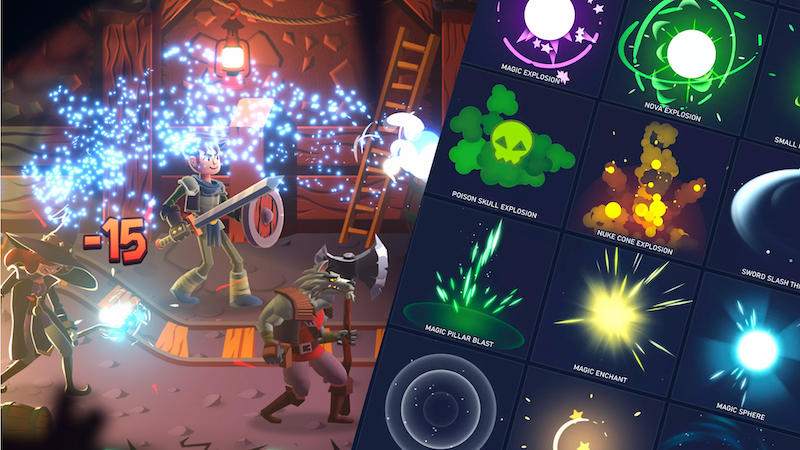
A scene from Dragon Crashers – 2D Sample Project, left, and an image from Epic Toon FX by Archanor VFX, right.
Visual effects in 2D projects
You can create 2D visual effects in Unity with several different methods. To make a fire effect, for example, you can animate the flames frame-by-frame, animate a sprite with a shader made in Shader Graph, or spawn fiery particles. For the latter method, you can choose the Built-in Particle System which runs on the CPU, or use the VFX Graph and the power of the GPU to spawn millions of particles. Both systems can be used in the same project so you can pick and choose what’s best for a particular effect.
This article focuses on VFX Graph, which can be used in 2D games from Unity 2022 LTS and up.
There are a few key points to consider before creating special effects in a Unity 2D project:
- Cameras: If you use a perspective camera your effects happen in a tridimensional space like they do in 3D games. If you use an orthographic camera, you need to set up the renderer of the system to use the right Sorting Layer. Read more about camera perspective here.
- Post-processing: You can apply post-processing effects to your 2D project if you choose the Universal Render Pipeline (URP), e.g., adding a bloom effect to a particle effect via the URP Volume framework.
- Effects can be achieved in different ways. For example, a GameObject representing an effect can have several child GameObjects using different systems, like sprites with custom shaders or several particle systems.
- Animation clips: Animation clips can help you orchestrate smooth sprite-based animation effects. You can even use Unity’s skeletal animation system (sparingly) to control parts of a sprite in a sprite animation.
- Unity Asset Store: Get a head start on adding visual effects to your project by heading over to the Unity Asset Store, where you’ll find many ready-made 2D effects.
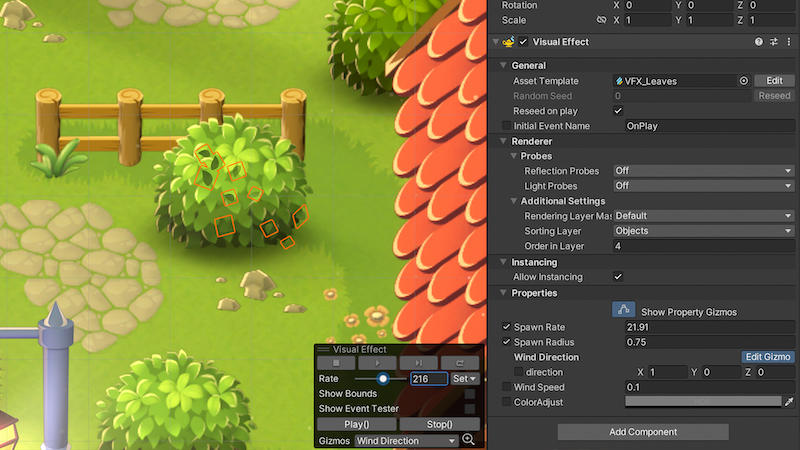
A VFX Graph creates the effect of leaves falling off the bushes.
The VFX Graph for 2D
Visual Effect Graph Assets are compatible with the 2D Renderer using Shader Graph in Unity 2022 LTS. To create a new VFX Graph in your project, follow the steps in the documentation.
The Output Contexts in a VFX Graph define how the effect will be rendered. Output Contexts for meshes like Output Particle Quad offer the option to add a Shader Graph. It doesn't matter if you start with a Lit or Unlit Output as the lighting model will be changed to adapt to the Shader Graph. You can use the default shaders listed below, or your own Shader Graph-based shader.
For 2D projects in URP you can use one of these three sprite-based Shader Graphs:
- Lit: To receive light from 2D light system
- Unlit: Unaffected by the 2D lighting system
- Custom: To implement a custom 2D lighting model
Remember to check the Support VFX Graph option in the SRP target inside Shader Graph.
Properties exposed in your shader graph are shown in your VFX graph. You can override them if needed, e.g., if you want a VFX Graph particle system to control the changing color of the shader over time.
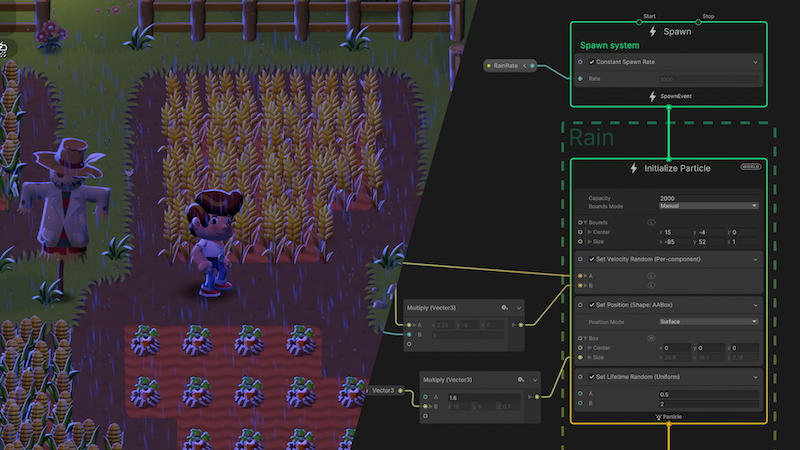
Setting up the rain effect with a VFX Graph in Happy Harvest
Make it rain with VFX Graph
Rain is a common particle-based effect in games. Here are the main steps used to create the rain in Happy Harvest with VFX Graph and the GPU, which allow for the movement of many individual particles:
- The rain particles (named Visual Effect Rain in the Hierarchy) are rendered in the Sorting Layer, above the ground but behind objects. The reason for this is water splash effects spawn when the drop particles meet the ground to simulate how real rain reacts. If the rain drops are visible on a vertical surface like a lamp post, it could look incorrect.
In the real world light affects all of its environment, including rain drops. In Happy Harvest, the VFX Graph for the rain uses a Sprite Lit-based Shader Graph in the Output Context to light the rain particles. Without a Lit Shader Graph match for the rain, its tone can’t change to reflect the changing light throughout the day.
Frame-by-frame splashes: When the rain particle dies, a Trigger On Die Block triggers a GPU event that spawns a single flipbook particle that plays a simple splash animation. Happy Harvest uses the Flipbook Shader Graph UV Block to display the different frames inside the texture. Alternatively, you can use the Flipbook Player Block inside VFX Graph to achieve the same effect.
- Rain particles appear in the foreground (named Visual Effect Rain Foreground in the Hierarchy). Since they simulate being close to the camera lens they don’t spawn a water splash upon hitting the ground.
- A variation of the previous effect is used with the flashing thunder effect (Visual Effect Rain Foreground Thunder). A sound effect is added for the thunder with a VFX Output Event Play Audio component. This component comes with the sample scripts of Output Event Handlers; the Output Event Context triggers it in the graph.
A flash of thunder: A simple but effective way to create this effect was to spawn a VFX Graph-based single particle initialized at the center of the camera position and big enough to fill up the screen. The Color Over Lifetime Block in the Output node changes the color of the particle by evaluating a gradient over time. In that gradient, transparency changes simulate the flashing and fading of the thunder flash.
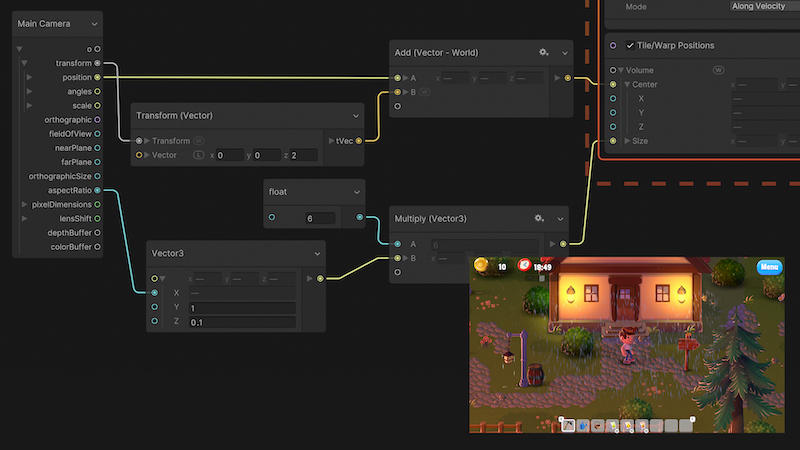
Adjusting the particles’ AABox size multiplier to make them fit on camera
Optimizing with camera tiling
The rain affects the entire scene in Happy Harvest, but because only a portion of it is visible through the camera, many of the calculated particles are unnecessary. You can check the Frustum Culling option in the Inspector to avoid rendering those particles, or use camera tiling, a trick employed in the demo.
Camera tilling allows you to create and render particles in a box that matches your Scene view, giving the impression that it tiles as if the particles are simulated everywhere in the scene. No particles are created outside of the camera, allowing you to reduce the amount of generated particles and capacity allocation of the effect without additional settings.
To use camera tiling in Happy Harvest, the rain spawn is set to match camera dimensions using a Set position shape: AABox. The camera format (enter the size manually, use the MainCamera directly, or use the aspectRatio slot) is scaled by a size multiplier to match the camera settings in the scene. The AABox is slightly larger than the actual camera size to avoid a popping effect caused by the culling. The Shape Spawn mode is set to Surface because there’s no need to spawn on the entire volume in a 2D project (because the Z axis is not used).
Once this setup is complete you need a Tile/Warp Positions Block in the system’s output. This is linked to the camera Transform to match its position and the camera dimensions, as you would also want to do in the Initialize Context of the system.
This technique also applies to rain effects in 3D, with the exception that Shape Spawn mode should be set to Volume and with a value other than zero for Z axis if you want depth look.
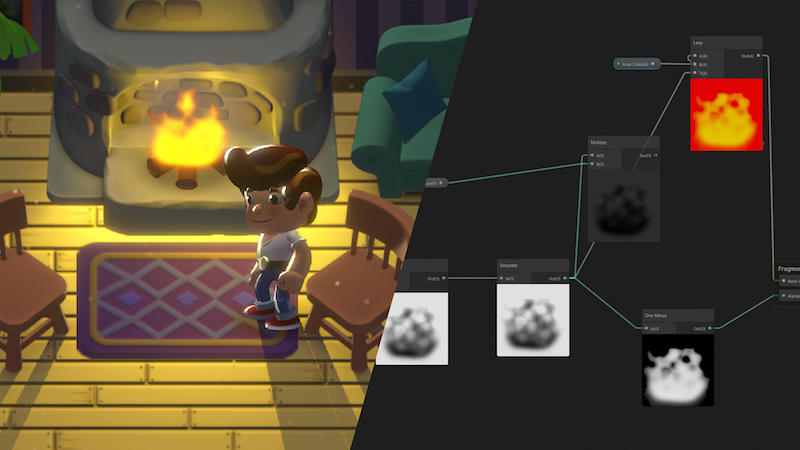
The farmer enjoys a VFX Graph-made fire at the end of his busy day.
The fire effect
Another common effect in games is fire. In Happy Harvest, there’s a cozy bonfire in the yard and in the fireplace in the farmer’s house. The fire effect consists of three sets of particles: Flames, sparks, and smoke, all spawned from the same graph called VFX_Fire.
Animating the flame
The smooth animation of the flame happens at the shader level in Shader Graph and shows what you can achieve by using the power of the GPU and shaders.
If you open the ShaderGraph_Fire file in the project, you’ll notice that a single sprite (Mask texture2D) is used to create a mask to give the flame an oval shape. The animation and sprite is created via a scrolling “Voronoi” pattern with noise and a tint color for the flame and the background. The alpha mask uses the same flame shape but with a Saturate Operator that produces a more visible outline.
Sparks and smoke effects, which add polished details to the fire, use the standard Lit Shader Graph. A combination of alterations on the Velocity, Scale, and Initial Position Blocks, creates a lively effect with only one sprite required. The graph for the sparks and smoke effects includes notes to help you recreate the effects in your own project.
Special effects help the water blend in with the style of the demo.
Water tiles animation
The water uses cartoon-like caustics or waves with transparency effects so it matches the overall art style in the demo. The water shader is optimized to work with tilemaps, which make up most of the demo’s environment.
The default 2D Lit material, called Water, is found in the Tilemap Renderer of the tilemap. This has been swapped for a custom material with the water shader. All of the tiles inside a tilemap are rendered using the same material, so this tilemap is only used for the water tiles.
In the ShaderGraph_Water graph the water effects are also generated from a stretched inverted Voronoi noise pattern to simulate the caustics (a common method in water caustics). The oscillating motion is a product of a tiling and offset UV overtime with a noise effect applied.
Refraction effect
The refraction effect is blended into the surface texture with the Lerp node. The refraction uses the Camera Sorting Layer texture, which is a snapshot of the camera rendering up until the defined sorting layer, meaning that all the elements in previous sorting layers will appear in that texture. In Happy Harvest, rendering occurs up until the Objects sorting layer, which is the one used for elements like the character. The UV of the Camera Sorting Layer texture is distorted with a normal map generated with the Normal and Height node, which uses the same Voronoi texture as that for the surface texture.
Watch this tutorial using the Lost Crypt 2D demo to get a step by step tutorial on other water effects in 2D.
The water can prefab has three animation clips attached to it.
VFX in gameplay
The effects discussed so far don’t interact with the gameplay in Happy Harvest; they are a part of the environment and play regardless of what’s happening in the demo. However, in most games, you’ll need to trigger some of the effects to play based on when an action occurs in the environment and/or with the character. Let’s look at some triggered effects in Happy Harvest.
Effects when using items
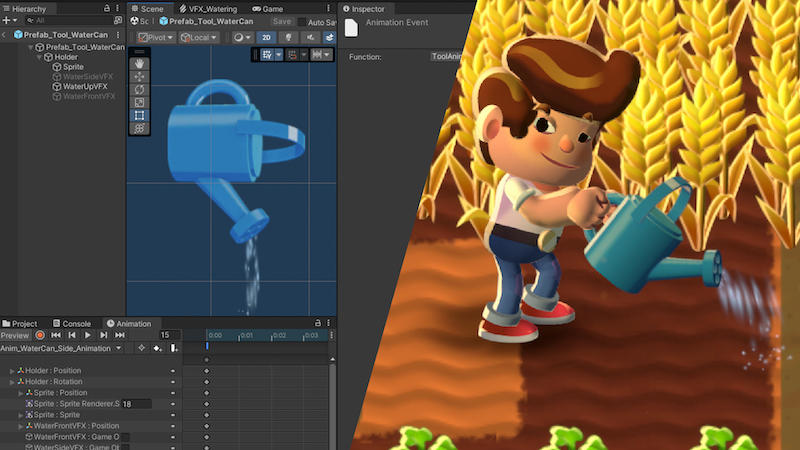
Some effects are attached to the character tools like the water can. The prefab for the water can, Prefab_Tool_WaterCan, has three animation clips that change the sprite based on the direction the character faces (up, down, sides). In those animations, there’s an animation event that calls a function inside a Tool Animation Event Handler component.
This script enables or disables the corresponding instances of VFX Graphs for each position that are referenced from the Inspector.
Effects when iterating with tiles
Some effects happen on the tiles, like digging and harvesting. This ensures they don’t cause issues with the character animations or change of position. When it’s time to till a cell, the tilling effect plays on that cell, and when it’s time to harvest, the cell calls on the harvest effect.
When the tilling effect is triggered, it references the TillingPuff_prefab effect from the TerrainManager component attached to the Grid GameObject. It moves to the center of the tile and then plays. Other effects like crop harvesting call the VFX Graph that is referenced from the Data/Crops ScriptableObject. At the initialization of the TerrainManager script, a VFX pool dictionary is created (the variable in the script m_HarvestEffectPool) that instantiates several VFX prefabs to play when necessary.
Small but thoughtful details can help boost immersion in a game world.
Small touches that make a difference
Small effects in Happy Harvest add polish to the demo and make it more enjoyable to explore. Some of these include:
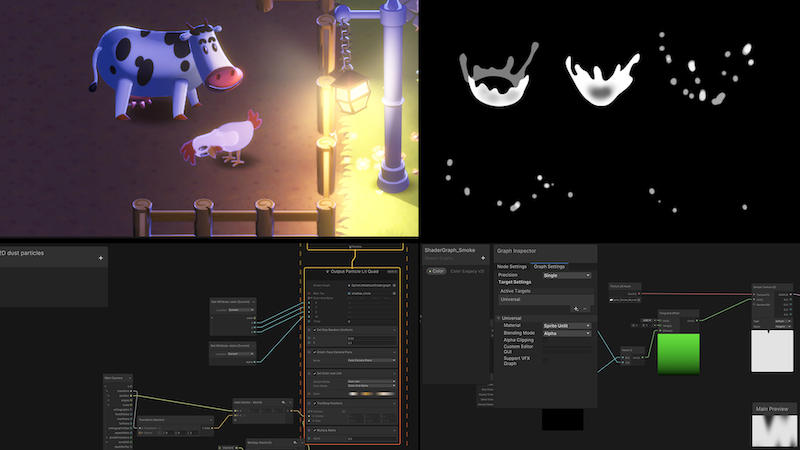
- VFX_DustParticles: To spread ambient dust in the environment
- VFX/Water: For subtle water waves and splashes
- VFX_Leaves: Triggers leaves falling from bushes when the player passes by
- Character: Triggers a smoke puff effect attached to the character; this is made with the Built-In Particle System
- P_VFX_Moths: Triggers moths flying near spotlights; this is also made with the Built-In Particle System
Each of the VFX Graph-based effects in the list above include notes explaining the purpose of each node.

Get the free e-book on visual effects in Unity
Created by an experienced Unity developer, with input from Unity engineers and technical artists, this is our biggest guide ever for developing visual effects. The e-book provides a complete overview of how to use visual effects authoring tools in Unity to create any kind of effect: water and liquid, smoke, fire, explosions, weather, impact, magic, electricity – the only limit is your imagination.
You can also see these two video tutorials on how to make special effects with VFX Graph: