
Comment faire - Techniques de lumière et d'ombre en 2D dans URP
Découvrez comment les lumières et les ombres de la démo Happy Harvest ont été créées à l'aide de l'Universal Render Pipeline (URP) dans Unity 2022 LTS.
Happy Harvest est un exemple de jeu de simulation d'agriculture en 2D de haut en bas. Les techniques présentées dans cet article, et bien d'autres encore, sont traitées en détail dans le livre électronique L'art du jeu en 2D, l'animation et l'éclairage pour les artistes.
Lisez les autres articles de cette série pour savoir comment reproduire les effets et les images de Happy Harvest:
- Comment animer des personnages 2D dans Unity 2022 LTS
- Comment créer de l'art et du gameplay avec des tilemaps 2D
- Effets spéciaux 2D avec le VFX Graph et le Shader Graph (bientôt disponible)
Télécharger Récolte heureuse sur le Unity Asset Store dès aujourd'hui.

Éclairage dynamique en 2D
L'éclairage dynamique en 2D peut changer radicalement l'ambiance d'un niveau et améliorer la jouabilité. Les exemples incluent l'éclairage d'une grotte avec une torche, la diffusion de lumière à travers une fenêtre pour mettre en évidence des grains de poussière étincelants et, dans le cas de Happy Harvest, l 'animation d'une simulation du cycle jour-nuit.
Le système d'éclairage dynamique 2D avancé d'Unity, associé aux textures secondaires de vos sprites, permet de faire ressortir vos personnages grâce à un éclairage de bord efficace et à des détails clairement ombrés.

Types et réglages de la lumière 2D
Les lumières 2D sont des objets de jeu auxquels est attaché le composant Lumière 2D. Ils fonctionnent avec le moteur de rendu des sprites, le moteur de rendu de la forme des sprites et le moteur de rendu de la carte des tuiles. Ils utilisent également des couches de tri, et chaque lumière est capable d'affecter une ou plusieurs couches. Vous pouvez sélectionner les couches qui seront affectées dans la liste déroulante Couches de tri cibles.
Il existe quatre types différents de lumières 2D :
Freeform : Ils peuvent avoir la forme d'un polygone à n côtés. Vous pouvez utiliser ce type de lumière dans des environnements non organiques ou stylisés. C'est un bon choix pour éclairer efficacement une grande partie de l'environnement (comme une piscine de lave), simuler des formes de lumière (comme des rayons divins traversant une ouverture au plafond) ou épouser la forme d'une fenêtre où la lumière est projetée.
Sprite : Cette forme permet d'utiliser n'importe quel sprite comme texture d'une lumière. Cela s'avère utile si vous souhaitez obtenir une forme particulière impossible à réaliser avec d'autres types de lumière. Parmi les exemples de textures possibles, on peut citer les éclats de lentilles, les éblouissements, les biscuits lumineux, les projections de formes lumineuses telles que les boules disco ou les lampes projetant des étoiles contre un mur.
Spot : Cette lumière peut être un cercle ou un secteur de cercle. Il est destiné aux projecteurs ou à l'éclairage d'un point précis à l'aide d'une torche, d'une bougie, d'un phare de voiture, d'une lampe de poche, d'une lumière volumétrique, etc.
Global : Cette lumière n'a pas de forme, mais éclaire tous les objets sur les couches de tri ciblées. Une seule lumière globale peut être utilisée par style de mélange (la méthode d'interaction entre la lumière et les sprites) et par couche de tri. Utilisez-le d'abord pour ajouter une lumière de base à l'environnement.
Ces réglages sont disponibles pour chaque type de lumière :
Style de mélange: Un style de mélange détermine la manière dont une lumière particulière interagit avec les sprites de la scène. Toutes les lumières de la scène doivent avoir l'un des quatre styles ou modes de mélange disponibles : Additif, modulé, soustractif et personnalisé. Chaque mode contrôle la façon dont un sprite est éclairé par la lumière.
Ordre de lumière et Opération de chevauchement: Ils vous permettent de contrôler ce qui se passe lorsque plusieurs lumières affectent les mêmes pixels.
Ombres: Lorsque vous activez cette option, les objets de jeu dotés d'une source d'ombre projettent des ombres à partir de cette source lumineuse.
Volumétrique: Cela vous permet de contrôler la chute de la lumière et de l'obscurité de l'ombre projetée.
Cartes normales: Lorsque cette option est activée, les informations de la carte des normales du sprite sont utilisées pour calculer la quantité de lumière en fonction de la direction du pixel.

Textures secondaires dans Happy Harvest
Vous pouvez attribuer des textures secondaires facultatives à chaque sprite d'un projet 2D via Éditeur de sprites > Textures secondaires. Il existe deux types de textures secondaires : Carte de normalité et carte de masque. Dans Happy Harvest, les cartes de normalité et de masque sont utilisées pour tous les éléments, du personnage aux tuiles et aux accessoires, ce qui permet de créer des effets d'éclairage et d'ombre en temps réel de grande qualité.
Carte normale
Les lumières et les cartes normales sont utilisées dans Happy Harvest pour créer l'illusion du volume et donner à la démo un aspect et une sensation uniques. Vous pouvez utiliser les cartes de normalité avec les lumières Spot, Point et Freeform.
La façon dont une carte de normalité est réalisée peut faire ou défaire l'illusion d'un sprite en 3D. Chaque pixel d'une carte de normalité stocke des données sur les angles de la texture principale. Les canaux rouge, vert et bleu (RVB) stockent les données d'angle pour les coordonnées X, Y et Z. Chaque lumière qui utilise une carte de normalité a une direction, et les pixels d'une texture avec une carte de normalité sont ombrés en fonction de cette direction ainsi que de la direction du pixel. Cela imite le fonctionnement de la lumière dans la vie réelle : si un pixel est orienté dans la direction de la lumière, il sera éclairé, et s'il est orienté dans la direction opposée, il ne recevra pas de lumière.
Carte des masques
Les masques contrôlent où les lumières peuvent affecter un sprite. Quatre canaux peuvent être sélectionnés comme canal de masquage : Rouge, bleu, vert et alpha. La valeur maximale d'un masque correspond à une pleine lumière et la valeur minimale à une absence de lumière.
Les cartes-masques permettent de peaufiner votre jeu en ajoutant des détails à vos images. Ils sont également utilisés par les styles de mélange de lumière 2D.
Le style de mélange prend la valeur d'une lumière à un pixel donné et multiplie cette valeur par le masque au même pixel. La valeur lumineuse masquée qui en résulte est ensuite ajoutée, soustraite ou multipliée par la couleur de ce pixel, en fonction du style de mélange choisi.
Cartes de masque utilisées pour les lumières de bord
Pour des raisons de lisibilité, les personnages ont souvent une lumière périphérique autour de leur silhouette lorsqu'ils se déplacent. L'éclairage des bords est un effet utilisé pour mettre en valeur les contours d'un personnage. Il simule la lumière provenant de l'arrière d'un objet et les propriétés naturelles de la diffusion de la lumière. C'est ce qu'on appelle l'effet Fresnel. Dans un jeu à défilement latéral en 2D, la surface du sol et l'arrière-plan peuvent contribuer à amplifier la silhouette du personnage. Dans les jeux de haut en bas, les silhouettes sont plus intégrées dans l'environnement et bénéficient donc d'un éclairage clair pour différencier leurs formes.
Le personnage principal et les accessoires de Happy Harvest comprennent une carte de masque pour l'effet de lumière de bord. Pour le personnage principal, la zone de lumière est dessinée dans le canal R, et le canal G est utilisé pour les accessoires. La raison en est d'éclairer la silhouette du personnage différemment des accessoires normaux (avec des jeux de lumières différents qui n'affectent que le canal R dans le canal Style de mélange).
Rappelez-vous que les cartes normales doivent être importées dans Unity en tant que Normal Map, et les cartes de masque en tant que type de texture Default. Cela garantit que, lors de l'empaquetage des textures avec Sprite Atlas, chaque texture n'est empaquetée que dans son atlas correct afin d'éviter les doublons.
Comment créer des cartes normales pour la 2D
L'éclairage 2D ne donne pas un bon résultat sur un sprite qui a déjà des ombres peintes. Vous finirez également par doubler la quantité de travail car vous devrez "peindre" l'éclairage dans les cartes normales. Si vous peignez plutôt des ombres non directionnelles, votre sprite aura un meilleur aspect à condition que vous évitiez toute lumière directionnelle, comme la lumière du soleil.
Créer des cartes de normalité pour chaque sprite, chaque tuile ou chaque forme de sprite peut prendre beaucoup de temps. Envisagez de combiner différentes techniques de génération, d'investir du temps dans le travail manuel lorsqu'il est vraiment important et d'automatiser les processus pour les accessoires d'arrière-plan. Notez que si vous générez le sprite 2D à partir d'un logiciel de modélisation 3D comme Blender ou 3ds Max, cette texture devrait être facile à générer.
Prenons quelques exemples :
- Morphiser une carte de normalité existante pour l'adapter à l'objet 2D en question. Par exemple, une bague ou une pierre précieuse pourrait utiliser les cartes normales de l'image.
- Utilisez un outil de génération de cartes normales comme SpriteIlluminator, NormalPainter, Tangent Normal Brush de Krita ou Laigter.
- Les applications de génération ne prennent pas en compte les angles de votre sprite, évitez donc de les utiliser sur l'ensemble du sprite. Ils ne reconnaissent pas non plus les objets. Au lieu de cela, ils estiment les formes à partir des couleurs des sprites ou en ajoutant un filtre général similaire au biseau ou au gaufrage dans les applications de retouche d'images.
- Ils ne peuvent pas reconnaître les angles d'un visage, mais tentent de deviner où il devrait y avoir un changement d'angle. Malgré cette limitation, elles sont toujours utiles pour générer des cartes normales de sections de sprites qui sont biseautées, comme des chaînes, des câbles ou la queue d'un dragon, ainsi que des normales de surface pour les briques, les pierres, le bois, et bien d'autres choses encore.
- Unity permet de générer des cartes normales à partir d'une carte de hauteur en niveaux de gris. Il s'agit d'une texture où le noir représente la hauteur minimale de la surface et le blanc la hauteur maximale. Importez une image en tant que carte normale et cochez l'option Créer à partir des niveaux de gris. Cette technique est pratique pour générer rapidement des cartes normales sans quitter le moteur.
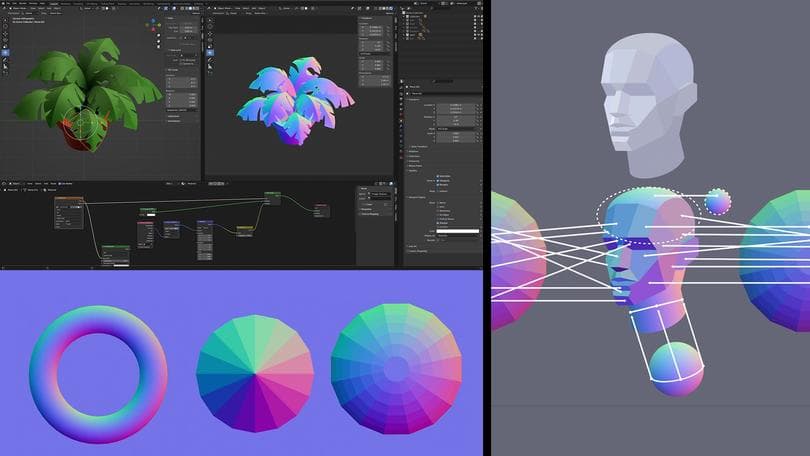
- Échantillonner la couleur à partir d'un échantillon d'image. Tout d'abord, procurez-vous une palette de cartes de normales (vous pouvez en trouver en ligne) afin d'échantillonner les couleurs utilisées pour représenter les angles de la surface. Il vous suffit de copier une palette dans votre application de peinture préférée et d'utiliser le sélecteur de couleurs pour sélectionner une couleur à peindre sur votre carte de normalité.
- Les couleurs de l'angle n'ont pas besoin d'être exactes à 100 %. Veillez toutefois à ce que la forme générale du sprite reste crédible. Si vous utilisez une couleur d'angle qui n'a pas de sens dans le contexte, la forme s'effondrera lorsqu'elle sera éclairée.
- Peindre des cartes normales peut s'avérer délicat au départ, car cela nécessite une bonne imagination spatiale. Essayez de commencer par quelque chose de simple, comme les plans de base de la tête. L'exemple utilisé ici est un modèle simplifié de tête humaine avec une apparence peu polie.
- Lorsque vous peignez une carte des normales, essayez d'imaginer les formes 3D de base qui font partie de votre sprite, puis visualisez les angles de chaque partie individuelle. Si vous connaissez l'angle, vous saurez quelle partie du sprite de la palette doit être échantillonnée.
- L'exemple présenté ici est celui d'une surface plane, mais le processus est similaire lorsque vous peignez avec des pinceaux plus souples. Vous pouvez estomper les bords durs pour obtenir un aspect plus naturel.
- Peignez manuellement les lumières et les ombres sur l'objet sous trois angles différents, un par canal RVB, et combinez les canaux de couleur. La lumière provenant du haut doit utiliser le canal G, la lumière provenant du côté droit doit utiliser le canal R et la lumière provenant du centre doit utiliser le canal B. Notez que le canal B est facultatif, ce qui vous permet de réduire la charge de travail tout en obtenant un résultat crédible.

Éclairage ambiant en 2D
Les lumières globales affectent l'ensemble de la scène, ce qui permet de changer facilement l'ambiance. Ils sont utilisés dans la démo (le GameObject appelé Ambient Light) pour appliquer une teinte générale et éviter les zones sombres.
Une lumière globale 2D est ajoutée par défaut dans chaque nouvelle scène. Ils n'ont pas besoin d'être blancs ou de changer la couleur, l'intensité ou les couches affectées pour appliquer une teinte uniforme à la scène.
Il ne doit y avoir qu'une seule lumière globale dans la scène. En manipulant ses paramètres, vous pouvez facilement simuler différentes conditions environnementales, comme la nuit, en réduisant l'intensité et en appliquant une teinte violette à la scène. Dans la démo, la couleur change en fonction de l'heure de la journée, un effet géré par le script DayCycleHandler, expliqué plus loin.

Lumière directionnelle 2D ou lumière du soleil
Un grand spot est utilisé dans Happy Harvest comme lumière principale. Il est fixé à la caméra, de sorte qu'il est toujours sur l'écran et tourne avec un script qui simule le mouvement du soleil.
Une scène 2D n'a pas de lumière de direction comme les scènes 3D. Cependant, vous pouvez utiliser une source de lumière qui éclairera les sprites à partir des positions X et Y. Cela vous permet de créer des effets tels que le déplacement du soleil au fil de la journée, ce qui peut s'avérer important dans les jeux de simulation et les jeux de type "top-down". Il convient également de noter que l'utilisation de grandes lumières a un coût si vous ciblez des plateformes bas de gamme. Consultez la section des conseils de performance à la fin de cet article.
Dans la démo, recherchez le GameObject enfant nommé LightsRotator, auquel sont attachées quatre lumières :
Veilleuse: Simule la direction du clair de lune
Lumière du jour: Simule la direction de la lumière du soleil (position opposée à celle de la veilleuse)
NightLightRim : Semblable à la lampe de direction lunaire NightLight, mais uniquement pour les lampes de bord de personnage et d'accessoire.
JourLightRim : Similaire à la lumière de direction DayLight, mais uniquement pour les lumières de bord de personnages et d'accessoires.
Le script qui contrôle le mouvement de ces lumières contrôle également le changement de couleur tout au long de la journée. Les dégradés choisissent la couleur pour chaque lumière à un moment donné. Vous pouvez voir ces dégradés dans le script DayCycleHandler attaché au GameObject DayCycleHandler.

Créer de la profondeur avec des lumières
Les lumières et les cartes normales sont utilisées partout dans Happy Harvest pour créer l'illusion du volume. Vous pouvez utiliser les cartes de normalité avec les lumières Spot, Point et Freeform. N'oubliez pas que vous devez activer les cartes normales dans l'objet lumière pour les utiliser dans les sprites. Deux réglages de qualité sont disponibles : Rapide et précis.
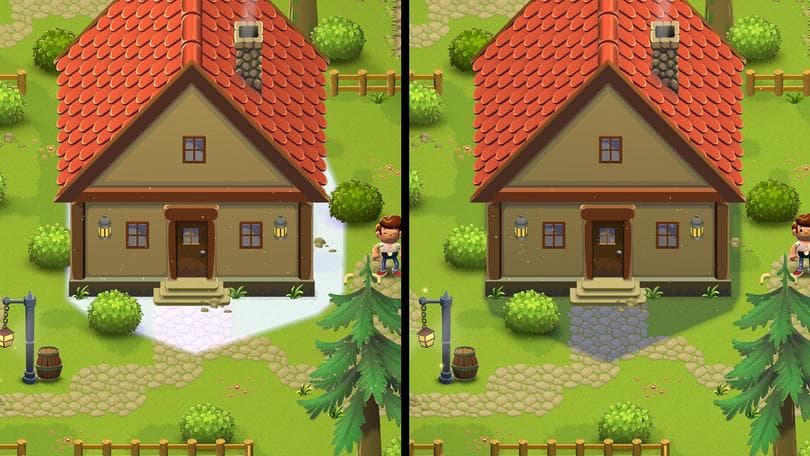
Vous pouvez voir comment les buissons simulent le volume en fonction de la position de la lumière lorsque les cartes normales sont activées. Les lampadaires et autres accessoires éclairent les zones d'intérêt et aident le joueur à s'orienter.
Création d'ombres en 2D

Projection d'ombres à l'infini
Les objets 2D peuvent projeter des ombres infinies en attachant le composant Shadow Caster 2D à n'importe quel sprite ou personnage animé.
Les ombres infinies produisent un effet agréable lorsque la zone de lumière est limitée ou qu'il y a une source de lumière forte et concentrée comme les lampadaires ou une cheminée.
N'oubliez pas d'activer les cartes normales dans l'objet lumière pour utiliser cette texture dans les sprites, et d'activer l'option Ombres.
En outre, la silhouette du personnage ne doit pas projeter d'ombre, car cela ne serait pas réaliste dans un jeu de haut en bas. Un composant Shadow Caster 2D n'affecte que les pieds puisqu'il est attaché aux os du pied dans le GameObject du personnage(Visual > Prefab_character_base > root_bone > ... > foot_r_bone et foot_l_bone).

Utiliser les ombres des blobs
Dans un jeu de haut en bas, une projection d'ombre sans fin provenant de la lumière du soleil peut sembler étrange. Une technique employée dans Happy Harvest consiste à utiliser une ombre de type blob sur les arbres et les buissons qui pivote et s'étire en fonction de l'heure de la journée. Le résultat est une ombre plus douce qui suit mieux la direction artistique.
La fonction UpdateShadow du script fait pivoter cette ombre. Comme les autres ombres de blob, celle-ci est une lumière basée sur des sprites. Vous pouvez le vérifier en inspectant n'importe quel GameObject à l'intérieur du GameObject parent appelé Trees. Recherchez le GameObject enfant appelé ShadowLong à l'intérieur du GameObject appelé RotationHandle. Le script Shadow Instance ajoute RotationHandle au script UpdateShadow. Ce script joue alors le rôle de gestionnaire, en utilisant une fonction pour mettre à jour la taille et la rotation des ombres.

Le cycle jour-nuit
Les ombres globales conviennent bien aux objets de petite taille ou plats, comme les panneaux d'affichage ou les arbres. Cependant, un grand bâtiment avec de la profondeur et une forme bien définie doit projeter une ombre précise. Dans Happy Harvest, les lumières Freeform créent ces ombres. Ils imitent la projection que le bâtiment produirait sur le sol, une approximation nécessaire puisqu'il n'y a pas d'information sur la profondeur en 2D.
Le défi des ombres bien définies est de les faire fonctionner avec le cycle jour-nuit. Pour que les ombres réagissent aux différentes positions du soleil, un script Light Interpolator modifie les points vectoriels de la lumière Freeform entre différentes ombres de référence.
Dans la hiérarchie de la démo, trouvez le GameObject nommé Light_2D_Warehouse. Quatre lumières Freeform y sont attachées, imitant l'ombre que le bâtiment projetterait lorsque le soleil est levé, baissé, et à droite et à gauche du bâtiment. Ce script crée une interpolation en douceur, en déplaçant les différents points vectoriels à l'aide de l'API.
L'ombre supérieure est créée en premier, puis modifiée pour créer les autres ombres. Il est important de veiller à ce que chaque ombre ait le même nombre de points et que la transition entre ces points soit prise en compte lors de la création de chaque ombre.
Une fois les ombres créées, elles sont ajoutées au script du composant Light Interpolator avec un paramètre Normalized qui indique le poids en temps de chaque ombre au cours de la journée. La fonction de prévisualisation du script vous permet de visualiser à l'avance l'aspect que prendra le script dans l'éditeur.

Contrôler l'heure de la journée
Le gestionnaire DayCycleHandler est le script qui orchestre le cycle jour-nuit. Examinons de plus près certaines de ses caractéristiques.
Le GameObject nommé Lights Root est le parent qui contient les Spot lights pour simuler la lumière du soleil et de la lune. La rotation est assurée par le script DayCycleHandler.
Les feux de nuit, les feux d'ambiance et les feux de bordure sont nommés de manière à indiquer leur fonction. Les gradients sont la teinte de couleur que chaque lumière affiche pour créer l'atmosphère appropriée.
Pour la variable Durée du jour en secondes, vous pouvez définir la durée du jour en secondes et fixer l'heure de début. Dans Test Time, vous pouvez prévisualiser l'aspect du jeu à différents moments dans l'éditeur.
Les paramètres permettant de contrôler les effets d'ombre finie sont l'angle d'ombre et la longueur d'ombre. Dans chacun de ces champs, la courbe d'animation indique l'angle des ombres dans le sens des aiguilles d'une montre tout au long de la journée. Le paramètre de longueur définit la longueur des ombres à un moment donné. Par exemple, vous pouvez avoir besoin d'une ombre plus longue lorsque le soleil se couche, et d'une ombre plus courte lorsque le soleil éclaire la scène perpendiculairement. Notez qu'il peut être nécessaire de déplacer le curseur Test Time pour actualiser les paramètres d'angle et de longueur de l'ombre.

Conseils de performance pour les lumières 2D
Le coût de l'ajout de lumières dans le jeu est une préoccupation commune lors de l'utilisation de l'éclairage 2D, en particulier sur les plates-formes mobiles. Il est recommandé de tester sur le matériel cible réel avec les spécifications les plus basses possibles. Il existe également quelques optimisations générales que vous pouvez appliquer pour améliorer les performances :
Maintenir le taux de remplissage aussi bas que possible. Une grande lampe peut être moins performante que plusieurs petites.
Les éclairages sont plus performants lorsqu'ils peuvent être mis en lots. Les lumières ayant la même configuration d'éclairage sur des couches contiguës peuvent toutes être dessinées ensemble.
L'échelle de rendu doit être aussi basse que possible. L'échelle de rendu ajuste la taille de la texture utilisée lors du rendu de l'éclairage, et une taille de texture plus faible signifie moins de pixels à rendre.
Réduire au minimum le nombre de lumières projetant des ombres à l'écran. Le passage au dessin des ombres a un coût non négligeable en termes de performances.
Réduire le nombre de styles de mélange à l'écran. Le passage à l'utilisation des styles de mélange entraîne un coût important.
Ajustez le nombre de textures Max Light Render et Max Shadow Render en fonction des besoins de votre projet. Des nombres plus élevés augmenteront les performances (jusqu'à une certaine limite), mais ils augmenteront également la mémoire nécessaire. Vous devrez trouver le bon numéro.
Plus de ressources
Si vous ne l'avez pas encore fait, téléchargez ces livres électroniques avancés qui couvrent le développement de jeux en 2D et le rendu (3D et 2D) dans Unity :
L'art du jeu en 2D, l'animation et l'éclairage pour les artistes
Introduction à l'Universal Render Pipeline pour les créateurs avancés d'Unity
Le guide définitif de l'éclairage dans le pipeline de rendu haute définition dans Unity
Découvrez également nos autres démos 2D, La crypte perdue et Dragon Crashers.
Vous trouverez d'autres ressources pour les programmeurs avancés, les artistes, les artistes techniques et les concepteurs dans le hub des meilleures pratiques d'Unity.