Comment animer des personnages 2D dans Unity 2022 LTS
Découvrez comment le personnage de l'exemple de projet Unity, Happy Harvest, a été animé. Cet article traite du rigging, des animations squelettiques en 2D, de la permutation des sprites, etc.
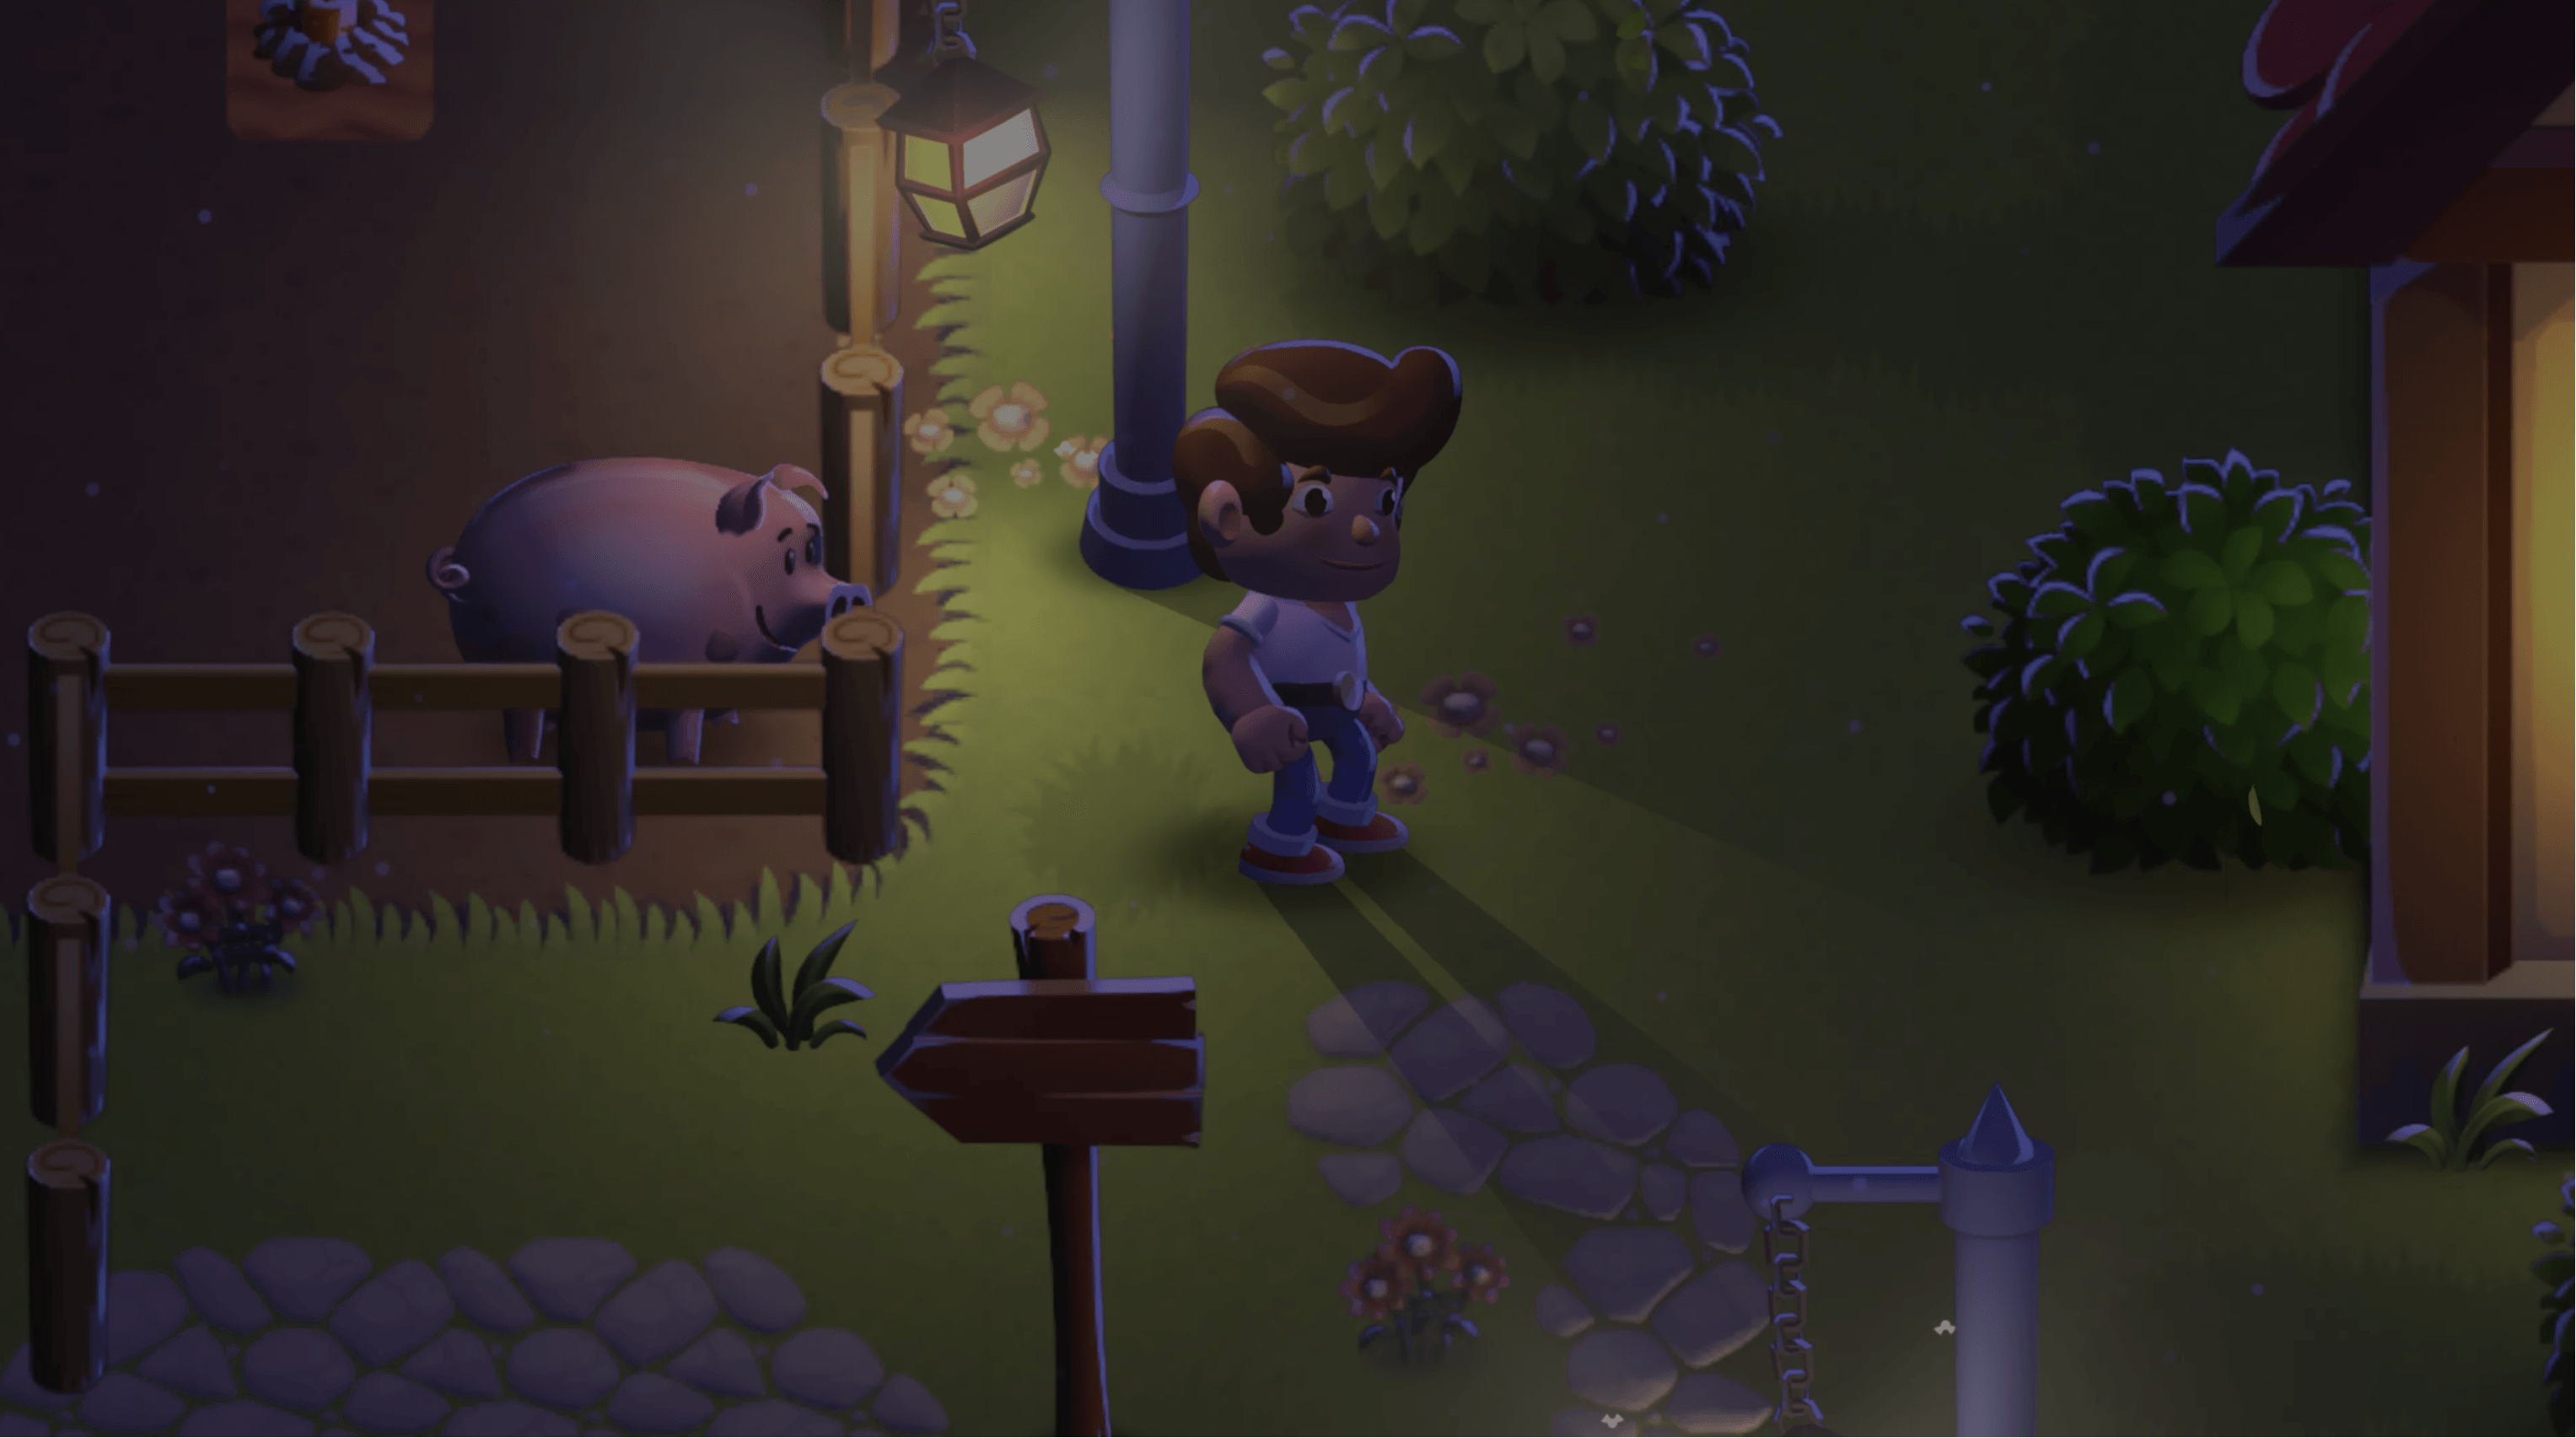
Happy Harvest est un exemple de jeu de simulation d'agriculture en 2D de haut en bas, rendu possible grâce aux dernières capacités de l'Universal Render Pipeline (URP) et d'Unity 2022 LTS.
Vous trouverez ces techniques, et bien d'autres encore, dans l'e-book L'art du jeu en 2D, l'animation et l'éclairage pour les artistes.
Lisez les autres articles de cette série pour savoir comment reproduire les effets et les images de Happy Harvest:
- Comment créer de l'art et du gameplay avec des tilemaps 2D
- Techniques de lumière et d'ombre en 2D dans le pipeline de rendu universel
- Effets spéciaux 2D avec le VFX Graph et le Shader Graph (bientôt disponible)
Télécharger Récolte heureuse sur le Unity Asset Store dès aujourd'hui.
Le personnage principal de Happy Harvest
Outre l'éclairage 2D, d'autres techniques ont été utilisées pour créer le personnage animé squelettique de Happy Harvest, notamment le rigging du visage du personnage pour créer différentes expressions, les bibliothèques de sprites pour les variations du personnage et le Sprite Swap pour passer d'un sprite à l'autre attaché au même os au cours du processus d'animation.
Considérations sur les perspectives
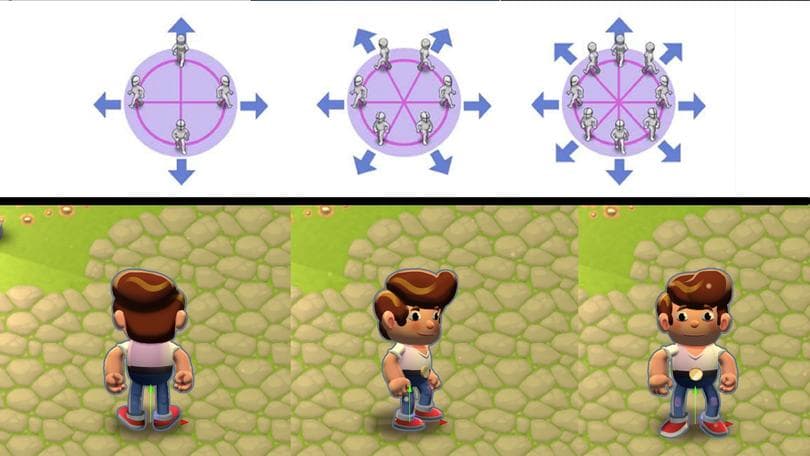
Dans un jeu de haut en bas, les personnages doivent être dessinés et animés de différents points de vue. Avec le style cartoon de Happy Harvest, vous pouvez obtenir de belles images en limitant les directions à quatre.
Il existe trois séries d'animations pour le personnage : Droite (ou "côté"), haut et bas. Le personnage est également inversé pour les animations orientées vers la gauche ou la droite.
Cela s'accompagne d'un compromis. Si le personnage est tourné vers la droite et tient un arrosoir dans sa main droite, l'arrosoir devra changer de main lorsque le personnage sera tourné vers la gauche.
Traitement des variations par direction
Gérer le changement de direction peut s'avérer difficile dans une perspective descendante. Vous pouvez ajouter de la complexité en créant un GameObject enfant par direction pour le personnage, et en l'activant ou le désactivant en fonction de la direction actuelle du personnage. Dans Happy Harvest, l'artiste a choisi d'utiliser un squelette unique avec différents sprites orientés dans le sens de la marche qui sont échangés en fonction de la direction. Cette solution a fonctionné pour le style bloc et dessin animé de l'échantillon.
Règles générales de l'animation 2D
Voici quelques techniques tirées de la démo pour concevoir un personnage qui sera riggé et animé :
Dessinez le personnage dans une position neutre, les bras et les jambes tendus. Si des parties du corps sont pliées, cela peut poser des problèmes lors de l'animation.
La résolution doit être un peu plus élevée que le nombre de pixels par unité(PPU) suggéré pour votre jeu. Une résolution peut sembler bonne au repos, mais la rotation et l'étirement des images peuvent entraîner une pixellisation.
Si vous utilisez beaucoup l'éclairage 2D dans votre jeu et que vous voulez tirer le meilleur parti des cartes normales, ne peignez pas la lumière et l'ombre sur votre sprite. Au lieu de cela, peignez des ombres non directionnelles. Cette technique est appelée occlusion ambiante. Votre sprite aura un meilleur aspect, mais vous devrez éviter d'utiliser une lumière directionnelle comme la lumière du soleil.
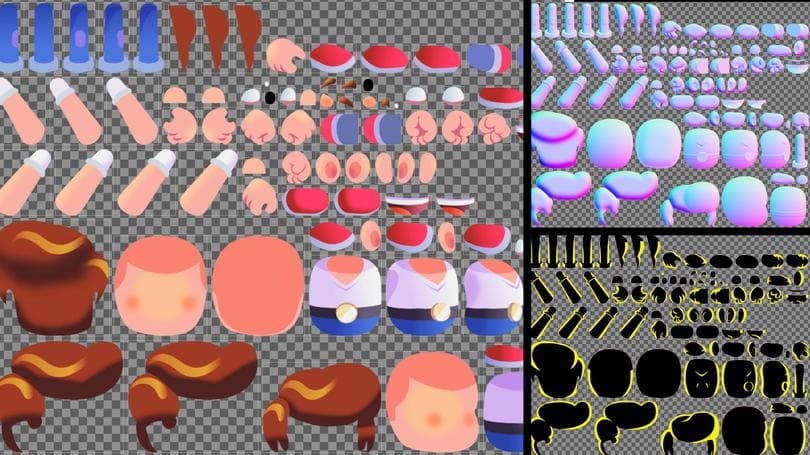
Les calques de parties du corps échangés à l'aide de la fonction d'échange de sprites doivent être regroupés en conséquence. Par exemple, toutes les couches avec la position de la bouche
Créer un personnage en animation 2D
L'animation 2D traditionnelle peut être la partie la plus longue et la plus difficile du développement artistique d'un jeu 2D. L'animation squelettique peut vous aider à gagner du temps, à créer des animations fluides et adaptables et à créer plus d'animations avec moins de ressources.
Le flux de travail PSD
Le pack Animation 2D vous permet d'importer vos dessins de personnages directement depuis Photoshop dans Unity. Le paquet PSD Importer traite les fichiers PSD et PSB en couches à cette fin. Vous pouvez importer tous les calques du personnage en tant que sprites et les placer exactement comme ils ont été peints dans l'application.
Lorsque vous sélectionnez un fichier PSD ou PSB importé, des options similaires aux paramètres d'importation de sprites s'affichent, mais avec des options supplémentaires pour l'animation 2D et le rigging. Les principales options que vous devrez sélectionner sont les suivantes :
Importer des couches cachées : Cette option permet d'importer tous les calques d'un fichier PSD ou PSB, y compris les calques cachés.
Sprites individuels (mosaïque) : Ce paramètre n'est disponible que si le type de texture est réglé sur Multiple. Il crée des sprites à partir des couches importées et les place dans un atlas de textures. Laissez cette option activée si vous souhaitez truquer un personnage.
Utiliser comme gréement : Cette option génère un préfabriqué de caractère avec la même hiérarchie de couches et la même position que le fichier PSD ou PSB.
Utiliser le groupe de couches : Cette opération permet d'ajouter des groupes de couches à partir du fichier PSD ou PSB. Activez-la pour regrouper des parties d'un personnage, comme les parties remplacées par un sprite.
Dans la section Gestion des couches, vous pouvez voir la hiérarchie des couches et ajouter ou supprimer manuellement des couches à importer.
Rigging dans l'éditeur de sprites
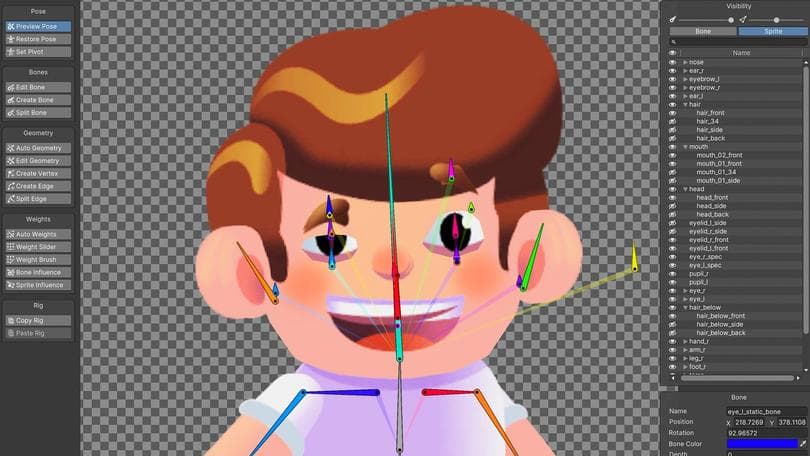
Vous pouvez créer le squelette d'un personnage dans l'éditeur d'habillage à l'intérieur de l'éditeur de sprites. Commencez par cliquer sur le bouton Créer un os, puis faites un clic gauche sur la zone de la fenêtre principale. Le premier clic crée un centre d'os et le second marque l'emplacement de la pointe de l'os. Cet outil enchaîne et emboîte les os les uns dans les autres.
Le bouton Modifier l'os permet d'affiner les os. Le bouton Diviser l'os permet de diviser les os en deux. Il s'agit d'une bonne option pour la fabrication de membres. Si vous créez un os de jambe et que vous cliquez à l'endroit où devrait se trouver le genou, l'os se divisera en cuisse et en mollet.
Si vous consultez le fichier PSD_Character_Boy.psd dans Happy Harvest, vous remarquerez quelques os supplémentaires, comme celui nommé face_bone. Ils permettent à la tête du personnage de tourner légèrement, ce qui lui donne un aspect presque tridimensionnel. Vous pouvez également observer les os utilisés pour déplacer les sourcils et les paupières afin de rendre le personnage plus expressif. Ce sont des détails efficaces à ajouter si le personnage principal parle à des PNJ.
Vous pouvez répartir et renommer les os dans la vue de la liste des os. Pour ouvrir cette vue, cliquez sur le bouton Visibilité à droite de la barre supérieure et sélectionnez l'onglet Os. Pour modifier le parent de l'os, faites-le glisser dans la vue en liste. Vous pouvez renommer les os en cliquant sur le nom de l'os actif. Le fait de nommer les os vous aidera à les retrouver plus tard.
Pour vérifier que la hiérarchie est correcte, sélectionnez le bouton Prévisualiser la pose et testez quelques poses. Pour réinitialiser la position des os, cliquez sur le bouton Réinitialiser la pose dans la barre d'outils.
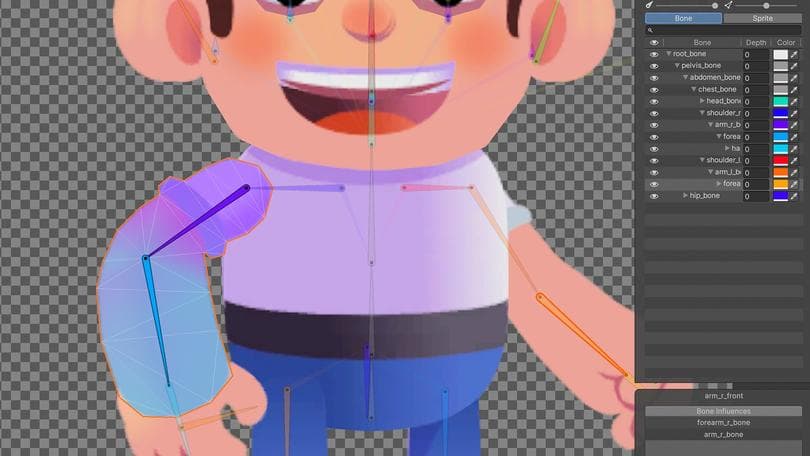
Connecter les sprites aux os, à la géométrie et aux poids
Afin d'assigner des sprites aux os, vous devez créer une géométrie. Commencez par appuyer sur le bouton Géométrie automatique. Une petite fenêtre s'ouvre et vous pouvez définir comment la géométrie sera créée.
Il est conseillé de mettre tous les curseurs à zéro pour que la géométrie soit aussi simple que possible. Activez l'option Poids pour lier automatiquement les os aux sprites. En cliquant sur le bouton Générer pour tous les sprites visibles, vous créez et définissez les poids des os pour tous les sprites. Pour effectuer cette opération pour un sprite individuel, double-cliquez sur le sprite. Cette fonction est utile pour modifier la géométrie de certains sprites.
Pour contrôler entièrement un certain nombre de sommets et la façon dont la géométrie se plie, vous devez modifier le maillage manuellement à l'aide des outils de la section Géométrie.
Utilisez le moins de sommets possible. Un nombre réduit de sommets permet de réduire les performances, car la position de chaque sommet doit être calculée en fonction de la rotation des os. Un nombre réduit de sommets permet également d'obtenir une meilleure courbure du maillage, car il est plus facile de définir des poids pour un nombre réduit de points. En outre, chaque plateforme cible a un nombre idéal de vertex de jeu, il est donc toujours judicieux d'optimiser la géométrie.
Poids
Une fois que la géométrie de vos sprites est nettoyée, il est temps de définir les poids. Les poids définissent l'influence de l'os sur chaque sommet, de zéro à un. Zéro signifie que l'os n'a aucune influence sur le sommet, et un signifie que le sommet se déplace comme s'il était collé à l'os. De bons poids sur le maillage peuvent donner un aspect réaliste à la flexion. Un mauvais réglage des poids peut briser l'illusion du jeu et déformer vos sprites.
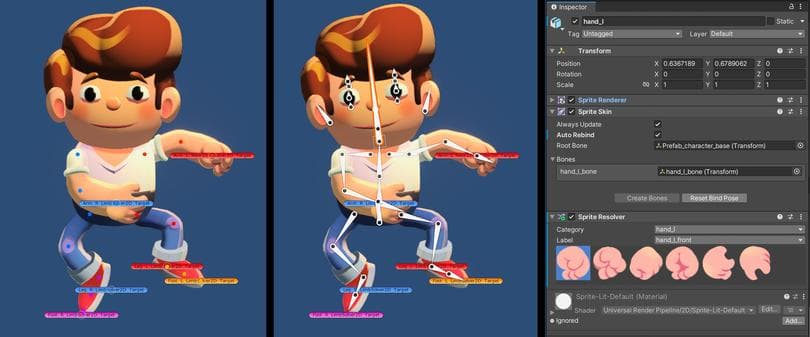
Pour commencer à paramétrer les poids, vous devez définir quels os affecteront un sprite donné. Cliquez sur le bouton Bone Influence et sélectionnez un sprite. Dans la petite fenêtre contextuelle, vous pouvez définir les os qui influencent le sprite sélectionné. Ne définissez que les os pertinents qui doivent affecter le sprite, et supprimez les autres.
Dans Happy Harvest, vous pouvez voir comment plusieurs sprites sont influencés par le même os. Par exemple, le hand_l_bone influence de nombreuses versions de la main, y compris le côté, l'avant et l'arrière.
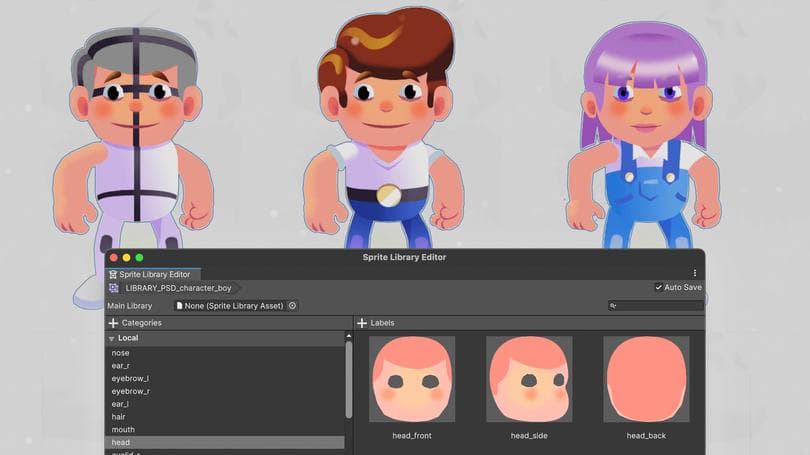
Bibliothèques de sprites
Tout ne peut pas être animé par la rotation d'un os. Parfois, vous avez besoin d'une autre expression faciale ou d'une autre pose de main, surtout si vous voulez que le personnage change de direction. Dans ce cas, vous pouvez échanger un sprite contre un autre avec Sprite Swap. Pour ce faire, vous devez d'abord organiser les sprites en catégories et en étiquettes dans une bibliothèque de sprites.
La fenêtre de l'éditeur de bibliothèque de spr ites permet de modifier le contenu d'une ressource de bibliothèque de sprites sélectionnée. Sélectionnez une ressource de la bibliothèque de sprites, puis choisissez Ouvrir dans l'éditeur de bibliothèque de sprites dans la fenêtre de l'inspecteur. Vous pouvez également ouvrir la fenêtre de l'éditeur de bibliothèque de sprites en cliquant sur Fenêtre > 2D > Éditeur de bibliothèque de sprites.
Une ressource de bibliothèque de sprites regroupe les sprites qu'elle contient en catégories et en étiquettes, et vous permet de modifier leur contenu dans la fenêtre de l'éditeur de bibliothèque de sprites. Dans Happy Harvest, recherchez LIBRARY_PSD_character_base, qui contient un caractère fictif. Après avoir réalisé des animations types pour confirmer que la catégorisation fonctionnait, nous avons créé des variantes telles que LIBRARY_PSD_character_boy. Comme chaque étiquette a une version correspondante dans toutes les bibliothèques de sprites, l'étiquette ou le sprite référencé peut être animé et affiché correctement lorsqu'une bibliothèque est remplacée par une autre.
Vous pouvez voir que les variations partagent également le même rig ou squelette en vérifiant les différents fichiers PSD, comme PSD_character_base et PSD_character_boy (os et structure identiques). Ceux-ci se plient également pendant l'animation.
Résolveurs de sprites
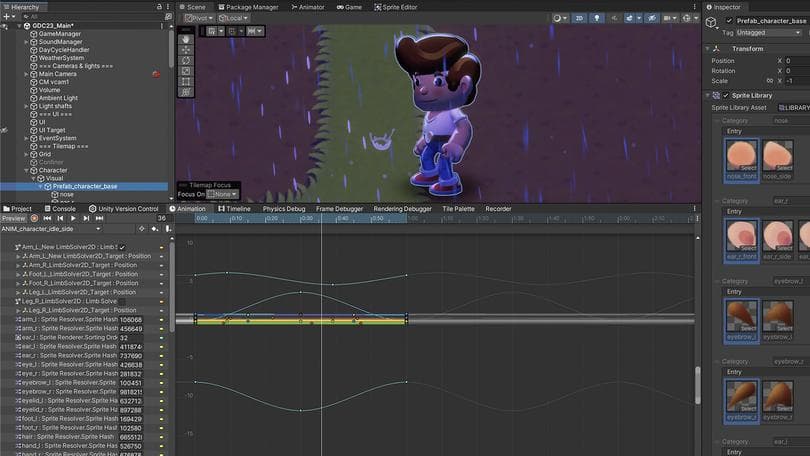
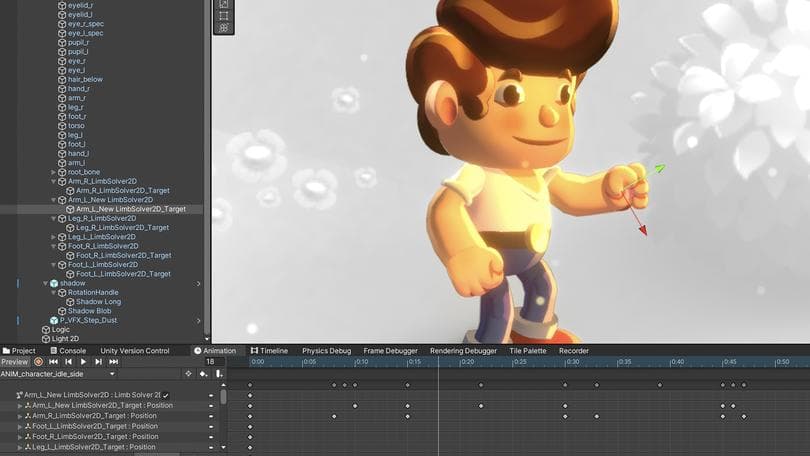
Pour observer les animations, sélectionnez le préfabriqué du personnage, puis Prefab_character_base dans Visual (il est recommandé d'inclure la partie visuelle d'un personnage en tant que GameObject enfant et d'utiliser le GameObject racine pour les collisions ou autres logiques).
La première image des animations, par exemple ANIM_character_idle_side, modifie les paramètres clés de la direction pour laquelle l'animation est créée. Il s'agit notamment de
Valeurs du résolveur de sprites : Le résolveur de sprites est un composant attaché à l'objet de jeu du membre qui permet d'échanger facilement des sprites de la même catégorie dans la bibliothèque de sprites. Dans ce cas, lorsque vous créez l'animation, sélectionnez les versions "latérales" des différents sprites.
Position de l'os : Il y a un léger changement de perspective entre la vue de face ou de dos et la vue de ¾ de côté. Vous pouvez créer cette perspective en déplaçant la position de départ des os de l'épaule et de la jambe, en utilisant la même plate-forme pour les animations face à l'avant et face à l'arrière.
Cinématique inverse 2D pour la position initiale de la cible : Le bras, le pied et les jambes utilisent la cinématique inverse 2D (2D IK) pour calculer la position de la chaîne osseuse en fonction d'une position cible. Vous pouvez voir comment la position cible de ces GameObjects est réinitialisée en regardant les éléments LimbSolver2D_Target.
Dans Happy Harvest, le passage d'une animation orientée vers la droite à une animation orientée vers la gauche est géré par l'utilisation de ANIM_character_face_left ou ANIM_character_face_right. Le seul paramètre qu'ils modifient est l'échelle du GameObject parent, en changeant X à une valeur de un ou négative de un, ce qui fait basculer l'ensemble du visuel sur l'axe X. Il est utilisé dans l'animateur qui contrôle le personnage, ce qui est expliqué dans la section suivante.
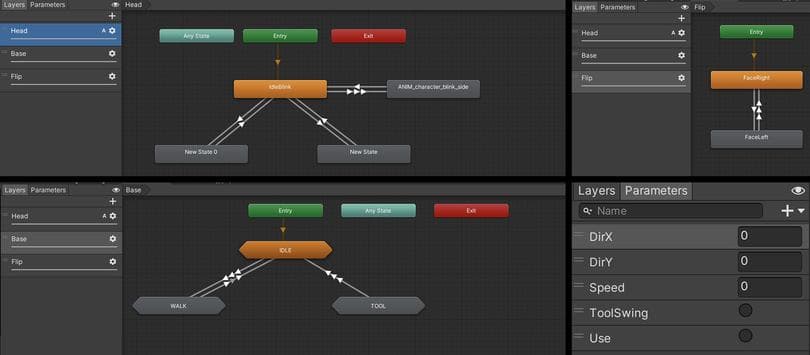
Contrôleur d'animation
L'agencement et la transition entre les clips d'animation dans la démo sont effectués par le contrôleur de l'animateur, qui met en place le flux de clips d'animation et de transitions qui peuvent lire des variables du jeu ou déclencher des changements d'état.
Dans Happy Harvest, si vous ouvrez la fenêtre Animator ou le fichier CONTROLLER_PSD_Character_base_prefab, vous verrez que le contrôleur Animator du projet est configuré. Examinez les couches du côté gauche qui gèrent les différentes parties du corps. La tête peut jouer une animation tandis que le corps en joue une autre, et ainsi de suite. Cela offre plus de possibilités sans augmenter le nombre d'animations à réaliser. Voici les couches d'animation de l'échantillon :
Tête : Ce calque est utilisé pour faire clignoter le personnage et lui faire regarder autour de lui. Il est marqué d'un A pour indiquer qu'il s'agit d'une couche additive. En tant que couche additive, elle mélange les animations de la tête (clignotement et regard autour de soi) avec celles des autres couches, comme l'inactivité ou la marche. Si ce calque était une surcharge au lieu d'être additif, il ne mélangerait pas les animations pour une propriété utilisée en même temps par plusieurs autres animations.
Base : Elle est utilisée pour les principales animations du corps - marche, inactivité et utilisation d'un outil. Chaque état a une forme hexagonale pour indiquer qu'il s'agit d'une machine à sous-état. Si vous double-cliquez sur IDLE, par exemple, vous verrez comment les paramètres DirX, DirY et Speed sont utilisés sous la propriété Conditions des flèches de transition pour déclencher la transition entre les animations, en fonction de la vitesse et de la direction d'orientation.
Retournement : Ce calque fait basculer le personnage à droite ou à gauche en fonction du paramètre DirX. L'animation, comme indiqué précédemment, modifie l'échelle du GameObject entier, d'une échelle X de un à une échelle négative de un (direction X inversée).
Vous pouvez utiliser l'onglet Paramètres (à côté de Calques) pour connecter l'Animateur.
Créer de nouvelles animations
Vous pourrez voir les résultats dans votre jeu si vous apprenez les principes de base de l'animation et si vous passez du temps à peaufiner les mouvements des personnages.
Pour créer de nouvelles animations pour le personnage principal, ouvrez une fenêtre d'animation via Fenêtre > Animation > Animation.
Sélectionnez le préfabriqué Prefab_character_base. En cliquant sur l'option Créer un nouveau clip dans le menu déroulant avec les animations existantes, vous créez un nouveau clip d'animation. Un clip d'animation est un enregistrement linéaire de la façon dont la position, la rotation, l'échelle et d'autres propriétés d'un objet changent au fil du temps. Votre nouvelle animation sera automatiquement ajoutée au contrôleur d'animation existant dans la première couche d'animation.
Commencez l'animation en cliquant sur le bouton rouge Enregistrer. Toutes les modifications apportées au personnage sont maintenant enregistrées dans un clip d'animation. Vous pouvez continuer à modifier l'animation en passant aux courbes ou en examinant les propriétés individuelles. Commencez à déplacer les os sous root_bone et voyez comment le personnage se comporte comme une marionnette.
Cinématique inverse 2D
Les mouvements du corps humain sont complexes. Si vous voulez saisir un verre d'eau sur une table, votre main doit se déplacer vers le point de l'espace occupé par le verre. Vous faites tout cela sans même penser à faire tourner votre bras et votre avant-bras, car votre cerveau effectue ces calculs de manière inconsciente.
Pour obtenir le même mouvement dans un jeu, vous devrez animer la rotation du bras et de l'avant-bras en même temps. C'est un véritable défi que de faire correspondre les deux rotations tout en réalisant un mouvement de main crédible. L'outil 2D Inverse Kinematics, qui fait partie du package 2D Animation, calcule les rotations et permet à une chaîne d'os de les déplacer vers des positions cibles.
Vous devrez d'abord ajouter un composant 2D IK Manager sur le GameObject au sommet de la hiérarchie, similaire à celui du Prefab_character_base. Ce composant est responsable de la gestion de tous les résolveurs IK du personnage. En cliquant sur le bouton +, vous ajoutez un nouveau solveur. Le solveur calcule la rotation des os pour qu'ils correspondent à la transformation cible.
Dans Happy Harvest, nous avons ajouté des résolveurs de membres. Il s'agit du solveur standard pour les jambes et les bras, qui peut résoudre jusqu'à deux os et l'effecteur (la propriété qui définit l'os ou la transformation que le solveur IK résout). Vous pouvez voir comment ils fonctionnent et sont organisés en regardant les GameObjects nommés LimbSolver2D au bas de la hiérarchie du GameObject parent du personnage.
Autres effets d'animation 2D dans le projet
Happy Harvest comprend un certain nombre d'animations simples et utiles pour les accessoires d'arrière-plan ou d'autres personnages. Parmi les points clés, on retrouve :
- Le cochon préfabriqué a une configuration simple sans IK 2D qui fonctionne bien pour un élément décoratif.
- Le mouvement de balancement des lampadaires (P_Lantern_Hanging) est un clip d'animation qui joue en boucle et ne modifie que la rotation du sprite au fil du temps, sans nécessiter de rigging.
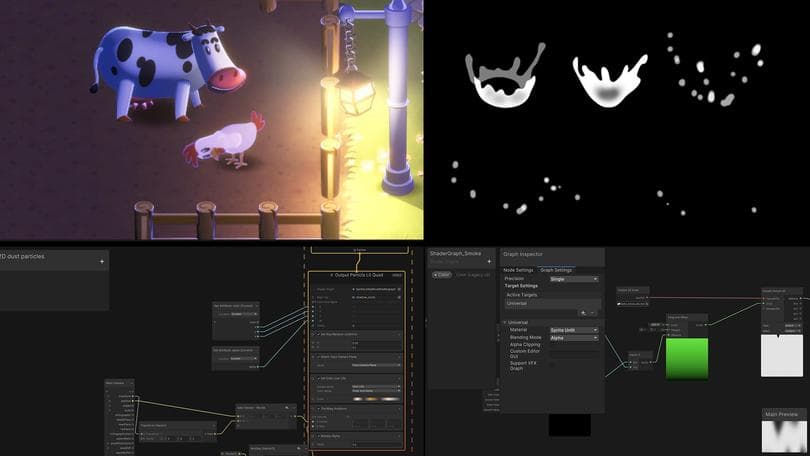
- L'animation Flipbook, ou image par image, est une méthode rapide pour animer des personnages d'arrière-plan mineurs avec moins de frais généraux car elle comporte moins d'images. Il est également bien adapté à l'effet d'éclaboussure d'eau.
- L'effet d'eau et la brise qui fait bouger les buissons et les arbres sont des effets spéciaux créés avec le Shader Graph et le VFX Graph.
Plus de ressources
Si vous ne l'avez pas encore fait, n'oubliez pas de télécharger ces livres électroniques avancés qui couvrent le développement de jeux en 2D, le rendu et les effets visuels (3D et 2D) dans Unity :
L'art du jeu en 2D, l'animation et l'éclairage pour les artistes
Introduction à l'Universal Render Pipeline pour les créateurs avancés d'Unity
Le guide définitif de la création d'effets visuels avancés dans Unity
Découvrez également nos autres démos 2D, La crypte perdue et Dragon Crashers.
Vous trouverez d'autres ressources pour les programmeurs avancés, les artistes, les artistes techniques et les concepteurs dans le hub des meilleures pratiques d'Unity.